
Enrollment
Delta Dental of Virginia offers three ways to update your enrollment:
- Submit online via the employer portal (available for all groups)
- Submit paper forms (available for all groups)
- Submit an electronic eligibility (EE) file
Below are instructions for each method. If you have questions, contact your account management team.
Online enrollment
Learn how to enroll a new employee by watching the quick video tutorial below, or scroll down for a step-by-step guide.
Step-by-step enrollment guide
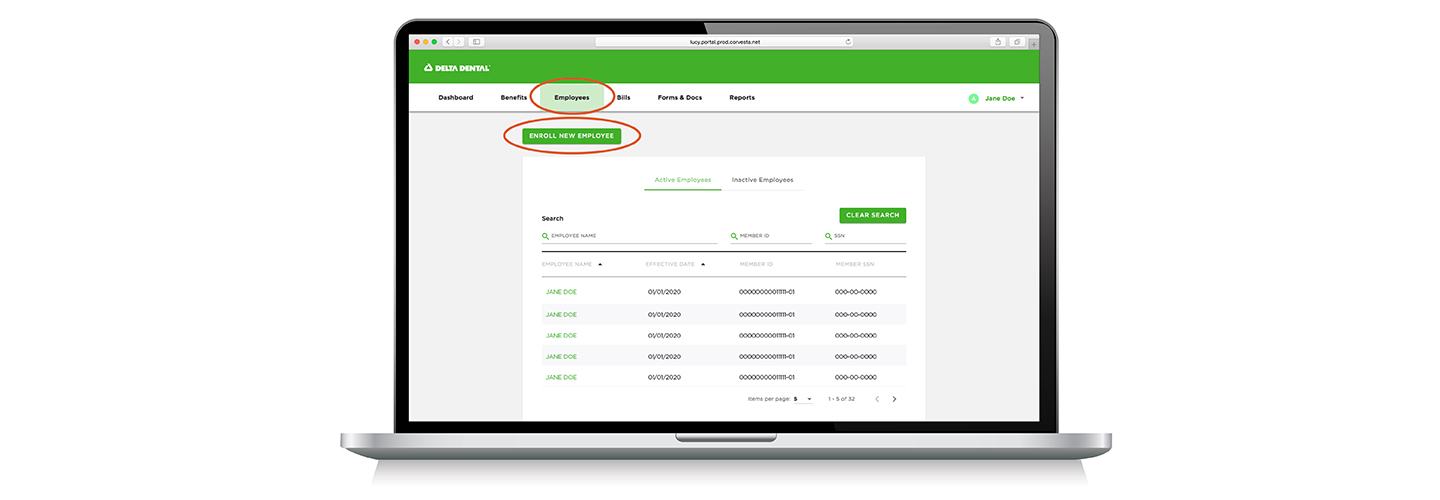
To enroll a new employee, log into the employer portal and click Employees, click the Enroll New Employee button, and then follow the steps outlined below.
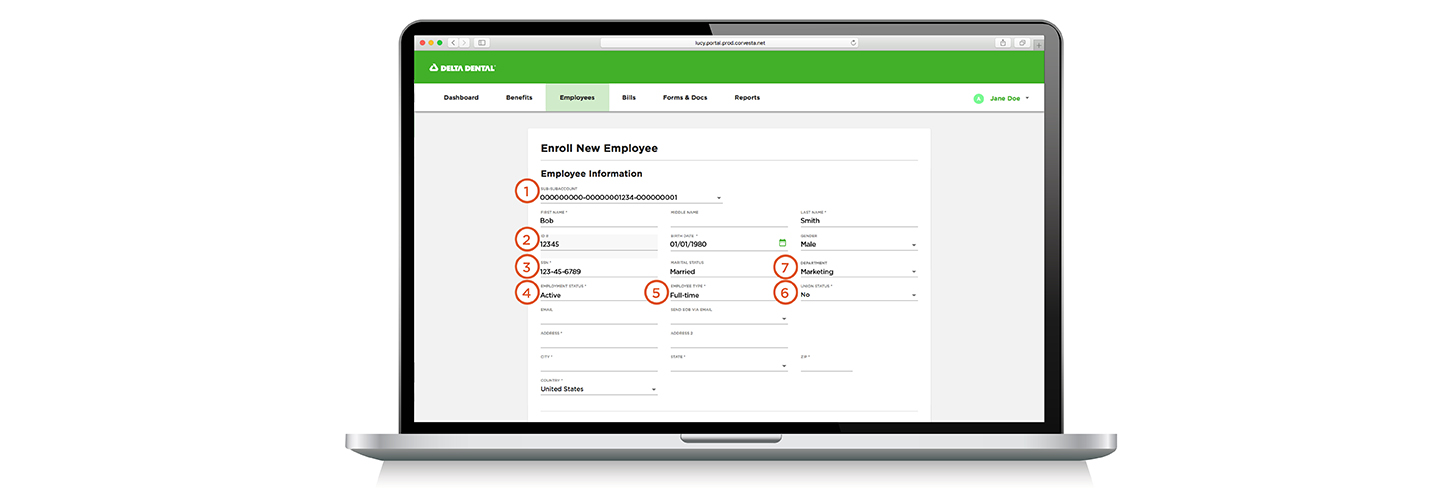
Enrolling an employee
- Select the enrollee's Sub-Sub Account, which is your company enrollment account number. If your company has more than one Sub-Sub Account, select the correct one from the drop-down list.
- Fill in the enrollee’s ID# if you are using a member ID number instead of a Social Security Number (SSN). If you are using SSNs, leave this field blank.
- Add the enrollee’s Social Security Number in the SSN field.
- Select an Employment Status from the drop-down list. This is a required field, but you can choose either “Active” or “Unspecified” if you are not grouping by COBRA, Retiree, etc.
- Select an Employee Type (Hourly, Salaried, Full-time, Part-time, etc.) from the drop-down list. This is also a required field, but you can choose either “Full-time” or “Unspecified” if you are not grouping by Employee Type.
- Select YES for Union Status if the enrollee is a union employee and you wish to group by union status. This field otherwise defaults to NO.
- Confirm that the Department you previously tracked through sub-locations is correct. If you are not tracking by department, this field will be blank.
- Enter the enrollee's Sub-Account Name, which is your company’s billing account. If your company has more than one billing account, pick the correct one from the drop-down list.
- Select the enrollee's Sub-Account Number, which is the billing account number associated with the Sub-Account Name, from the drop-down list.
- Select the enrollee's Benefit Plan option from the drop-down list. If you offer a single Benefit Plan, it will automatically display.

Paper enrollment for risk groups 100+
If your group has 100 or more employees and you are submitting paper enrollment, click the Large group enrollment form button below to download the updated form. Effective 03/30/2020 the old form will be obsolete. To ensure timely processing of new enrollees, discard older forms, download the new one and follow the steps below.
Large group enrollment form
- Enter your Account Number in the Account No field. Omit the leading zeros (e.g. “00000001234” = “1234”).
- Enter your Sub-Account Number, which is the billing account number, in the Sub-Account No field. This is your Account Number followed by a ten-digit number unique to your billing address. If Account Number 1234 has one billing address, for instance, its ten-digit number would be “0000000001,” making its Sub-Account Number (zeros again omitted) 1234-1.
- Enter your Sub-Sub-Account Number, which is based on the number of eligibility sources you use. If you submit manual and electronic eligibility, your Sub-Sub Account Number would be 1234-1-3.
- If you track employees by department, enter their department in the Department field. If you have more than one department, use the appropriate department provided in the account structure information we provided you. If you have not received this document, contact your account management team or call us at 800.237.6060. You may otherwise ignore this field.
- Enter the Benefit Plan Option in the Benefit Plan ID field. If you have multiple benefit plans, please use the account structure information we provided you. If you have not received this document, contact your account management team or call us at 800.237.6060. You may otherwise ignore this field.
- Check the box corresponding to the enrollee's Employment Status, e.g. Active, COBRA, Retiree, etc., in the Employment Status (choose one) box. If you do not track employment status, check Active.
- Check the box corresponding to the enrollee's Employment Type, e.g. Hourly, Salaried, Full-Time, etc. Employee Type box. If you do not track employee type, check Full-Time.
- Check the box corresponding to the enrollee’s Union Status.
- Complete Section A: Enrollment/Change as before, except that the Effective Date should be the day after coverage ends (“to” not “through”). If, for instance, the enrollee had coverage through 12/31/19, the Effective Date is 01/01/2020. For more information, click here.
- Enter the enrollee's Social Security Number in the Social Security Number field. Leave blank if the enrollee requests that this number not be used.
- Enter any alternate Group-Assigned ID you are using in the Group-Assigned ID field.
- Complete Sections C and D as before. The Member SSN column in Section D is optional.
Paper enrollment for pool groups
If your group has less than 100 employees and you are submitting paper enrollment, click the Pool group enrollment form button below to download the updated form. Effective 03/30/2020 the old form will be obsolete. To ensure timely processing of new enrollees, please discard old forms once you have downloaded the new one. Then follow the steps below.
Pool group enrollment form
- Enter your Account Number in the Account No field. Omit the leading zeros (e.g. “00000001234” = “1234”).
- Enter your Sub-Account Number, which is the billing account number, in the Sub-Account No field. This is your Account Number followed by a ten-digit number unique to your billing address. If Account Number 1234 has one billing address, for instance, its ten-digit number would be “0000000001,” making its Sub-Account Number (zeros again omitted) 1234-1.
- Enter your Sub-Sub-Account Number , which is based on the number of eligibility sources you use. If you submit manual and electronic eligibility, your Sub-Sub Account Number would be 1234-1-2.
- Check the box corresponding to the enrollee's Employment Status, e.g. Active, COBRA, Retiree, etc., in the Employment Status (choose one) box. If you do not track employment status, check Active.
- Check the box corresponding to the enrollee's Employee Type, e.g. Hourly, Salaried, Full-Time, etc. Employee Type box. If you do not track employee type, check Full-Time.
- Enter the Benefit Plan Option in the Benefit Plan ID field. If you have multiple benefit plans, please use the account structure information we provided you. If you have not received this document, contact your account management team or call us at 800.237.6060. You may otherwise ignore this field.
- Complete Section A: Enrollment/Change as before, except that the Effective Date should be the day after coverage ends (“to” not “through”). If for instance the enrollee had coverage through 12/31/19, the Effective Date is 01/01/2020. For more information, click here.
- Enter the enrollee's Social Security Number in the Social Security Number field. Leave blank if the enrollee requests that this number not be used.
- Enter any alternate Group-Assigned ID you are using in the Group-Assigned ID field.
- Complete Sections C and D as before. The Member SSN column in Section D is optional.